Asphalt looks tough. It handles traffic, heat, rain, and snow. But it does not last on its own. Without protection, it dries out, cracks, and breaks down faster than most people expect.
This blog covers Sealcoating 101 — what it is, why it matters, when to do it, and how often you should schedule it. If you own a driveway or manage a parking lot, this will help you protect your investment.
What Is Sealcoating?
Sealcoating is a protective layer applied over asphalt pavement. It acts like a shield. The coating blocks sunlight, water, oil, and chemicals from soaking into the surface.
Think of it as sunscreen for asphalt.
It does not fix deep damage or major cracks. It protects pavement that is still in good condition. When applied at the right time, it extends the life of asphalt by several years.
Why Sealcoating Matters
Asphalt contains oils that keep it flexible. Over time, sun and oxygen dry out those oils. The surface becomes brittle. Cracks start to form. Water gets inside. Then the real damage begins.
Sealcoating slows this process.
Here are the main reasons it matters:
1. Protects Against Water Damage
Water is asphalt’s biggest enemy. When it seeps into cracks and reaches the base, it weakens the structure. Freeze and thaw cycles make it worse. Potholes form soon after.
Sealcoating seals small surface gaps and reduces water penetration.
2. Prevents Oxidation
Sunlight causes oxidation. Oxidation dries the pavement and fades its color from black to gray. Dry pavement cracks more easily.
A fresh sealcoat blocks UV rays and restores the rich black finish.
3. Guards Against Oil and Gas
Parking lots and driveways deal with oil leaks and fuel spills. These chemicals soften asphalt and cause surface damage.
Sealcoating creates a barrier that resists these fluids.
4. Improves Appearance
A freshly sealed surface looks clean and well maintained. This matters for businesses. Customers notice parking lots before they enter a building.
Curb appeal counts.
5. Saves Money Long Term
Replacing asphalt costs far more than maintaining it. Routine sealcoating delays major repairs and full replacement.
Preventive care always costs less than reconstruction.
Sealcoating 101: When Should You Sealcoat?
Timing is everything. Sealcoating too early or too late reduces its value.
New Asphalt
Do not sealcoat brand-new asphalt right away. Fresh pavement needs time to cure. The oils must settle and harden.
Most professionals recommend waiting 6 to 12 months after installation.
Existing Asphalt
If your pavement is in good shape with minor cracks and fading, it is ready for sealcoating.
Signs it is time:
- Color has faded to gray
- Small surface cracks are forming
- Water does not bead on the surface
- The pavement feels dry and rough
If there are large cracks, potholes, or drainage issues, repair those first. Sealcoating is not a repair method. It is protection.
Best Time of Year for Sealcoating
Weather plays a big role.
Sealcoating works best when:
- Temperatures are above 50°F
- No rain is expected for 24 hours
- Humidity is moderate
Late spring through early fall is ideal in most regions. Cold weather prevents proper curing. Rain can wash away uncured material.
Dry, warm days give the best results.
How Often Should You Sealcoat?
This is one of the most common questions in Sealcoating 101.
For most driveways and parking lots:
- Every 2 to 3 years is ideal
High-traffic commercial lots may need it closer to every 2 years. Residential driveways often last closer to 3 years.
Over-sealcoating is not helpful. Applying it too often can cause buildup and surface flaking. Follow a regular but reasonable schedule.
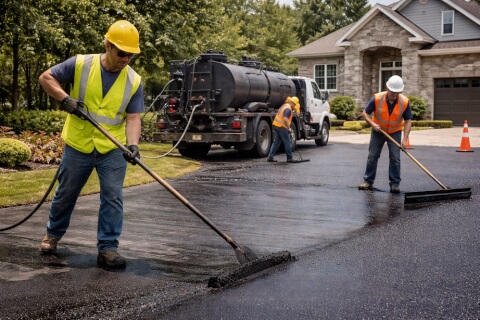
The Sealcoating Process
Understanding the process helps you know what to expect.
Step 1: Cleaning
The surface must be clean. Dirt, debris, and oil stains are removed. Power blowers and wire brushes are often used.
Step 2: Crack Filling
Small cracks are filled before sealing. This prevents water from slipping under the coating.
Step 3: Edge Protection
Grass, sidewalks, and buildings are protected to avoid overspray.
Step 4: Application
Sealcoat material is sprayed or squeegeed evenly across the surface. Coverage must be consistent. Thick spots can crack. Thin spots wear out fast.
Step 5: Drying Time
The surface needs 24 to 48 hours to cure before traffic returns. Foot traffic may be allowed sooner depending on conditions.
Proper curing is critical. Driving on it too soon can leave marks or damage the finish.
Common Sealcoating Mistakes
Poor application causes problems. Here are mistakes to avoid:
- Sealing damaged pavement without repairs
- Applying during cold or rainy weather
- Skipping cleaning steps
- Using low-quality materials
- Opening the area before it fully dries
Hiring experienced professionals reduces these risks.
Sealcoating vs. Resurfacing
People often confuse these two.
Sealcoating is preventive maintenance. It protects the top layer.
Resurfacing, also called overlay, adds a new layer of asphalt over the old surface. It corrects larger issues but costs much more.
Sealcoating delays the need for resurfacing. That is the goal.
How Long Does Sealcoating Last?
Results depend on:
- Traffic volume
- Weather conditions
- Surface prep quality
- Material used
Most properly applied sealcoats last 2 to 3 years. Heavy traffic shortens lifespan. Proper maintenance extends it.
Routine inspections help you stay on schedule.
Is Sealcoating Worth It?
Yes, when done at the right time.
Sealcoating:
- Extends pavement life
- Improves safety
- Enhances appearance
- Reduces long-term costs
Skipping maintenance often leads to expensive repairs. The math is simple. Small routine costs prevent large future bills.
Signs You Waited Too Long
Sealcoating cannot fix structural damage. If you see:
- Deep cracks wider than a quarter inch
- Potholes
- Drainage problems
- Loose or crumbling edges
You likely need repairs first. In severe cases, resurfacing or replacement may be required.
That is why routine maintenance matters.
How to Maintain Asphalt Between Sealcoating
Sealcoating works best when combined with basic care.
Simple steps include:
- Cleaning debris regularly
- Filling cracks early
- Fixing drainage issues
- Re-striping parking lots as needed
- Avoiding sharp heavy equipment turns
Small actions extend pavement life.
Sealcoating 101 for Homeowners
Driveways face lighter traffic than commercial lots, but weather still causes damage.
Homeowners should:
- Inspect surfaces each spring
- Fill small cracks quickly
- Schedule sealcoating every 2 to 3 years
- Avoid parking heavy equipment on edges
A well-maintained driveway boosts curb appeal and property value.
Sealcoating 101 for Business Owners
Parking lots affect customer safety and image. Faded lines and cracked pavement look neglected.
Business owners should:
- Inspect lots twice a year
- Repair cracks before winter
- Sealcoat on a 2-year cycle
- Repaint striping after sealing
Well-kept pavement reduces trip hazards and liability risks.
Choosing the Right Contractor
Not all sealcoating jobs are equal.
Look for contractors who:
- Clean surfaces thoroughly
- Repair cracks before sealing
- Use commercial-grade materials
- Provide clear timelines
- Offer written estimates
Avoid companies that promise unrealistically low prices. Cheap materials and rushed work fail quickly.
Final Thoughts on Sealcoating 101
Sealcoating is simple but powerful. It protects asphalt from water, sun, and chemicals. It improves appearance. It reduces repair costs.
The key points in Sealcoating 101 are clear:
- Wait until new asphalt cures
- Seal every 2 to 3 years
- Repair cracks first
- Apply during warm, dry weather
- Use quality materials
Asphalt does not last forever. But with routine sealcoating, it lasts much longer.
Protect it early. Maintain it regularly. Replace it later than you would without care.